
Version 2.0, guiding through everyone's favourite 3-biscuits method.
Hello and welcome to my Mitile Cannon guide, v 2.0! I've previously made a v1.1, which guides through the 2-biscuits + 1 recovery item method. Version 1.1 is more suitable for casual players who wants to get any random all-999 chibi & do less calculation on probabilities. I recommend giving it a read when you've just begun the game! BUUUUUUTTTTTTTTT If you want to go hardcore and do things the expert way -- that is, get your choice of all-999 chibi with skill level (slv) of 5 -- then this is the guide for you! In this guide I will explain several things:
1) How Bar Bennett works (recap)
2) Brief summary on how to make a specific chibi with slv of 5
3) The different ways in which you can activate Mitile's omotenashi bonus.
ACKNOWLEDGEMENT: This entry is image-heavy, lengthy (3,000+ words) & is best viewed on PC. Also, this guide provides an explanation but the actual execution is RNG-reliant in practice. You will get frustrated at times but keep trying! The key items, 3 large biscuits, are rare drops and therefore difficult to get. I suggest practicing with small biscuits first before doing it seriously. Lastly, Mitile is a sweet baby and must be protected. Give him lots of corn soup afterwards.
Table of Contents
I. How Bar Bennett Works
II. Party Formation
III. Bar Bennett Strategy
IV. Execution
---
Let me start by giving you this image:

That's it. That's what we want to achieve; activate Mitile's bonus and get those sweet 600 parameters x 5 attributes bonus. Let's see how, shall we?
I. How Bar Bennett Works
I'm going to repeat the points from the Wiki (thank you team)
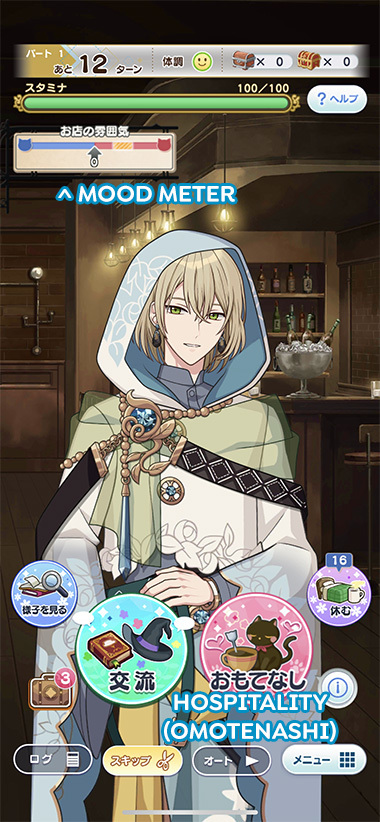
✤ POINT 1: Omotenashi (Hospitality)
Omotenashi is the [Special Command] ("gimmick" henceforth) of Bar Bennett! So basically, your main wizard will be providing some customer service/hospitality/omotenashi to the other wizards. Do so to gain various bonuses! Each wizard has their own omotenashi bonuses, which you can find here.
See that mood meter? It indicates the atmosphere of the bar. Blue is negative/peaceful, while red is positive/lively. To activate the gimmick, you need to land your arrow within the perfect atmosphere, which is indicated by the yellow area.

✤ POINT 2: Hitting the Yellow Area
Manipulate your mood (arrow) by selecting the different training menus. Options which have the blue label will shift your mood to the left, while red label will move your mood to the right. Choose your desired mood change to land yourself within the yellow area. THEN you can activate the special command.
✤ POINT 3: Varying Resting Moods
The resting mood changes each turn. It follows the pattern of, [12 ~ 19], [22 ~ 29], [32 ~ 39] and goes back to [12 ~ 19]. For example, if, in this turn, your resting mood is [-25], then it'll change to somewhere between [-32 ~ -39] in the next turn. Consider this in your planning and rest strategically!
We are unable to activate the gimmick outside of the yellow area
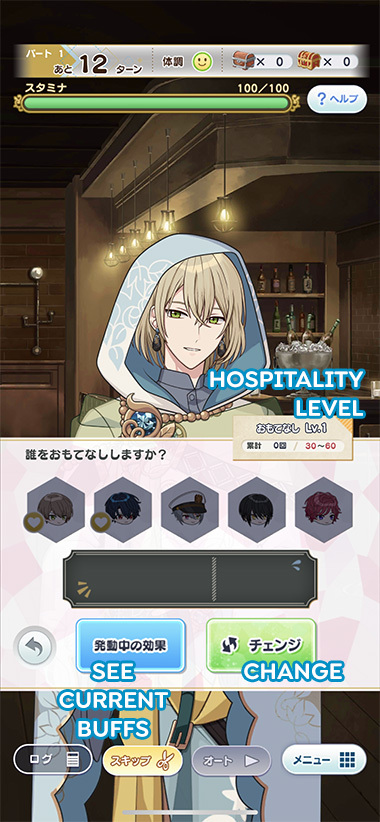
✤ POINT 4: Omotenashi Level
Your wizard keeps on getting better at providing customer service the more you do it! Omotenashi level can increase up to lv 5, and the bonus varies. The higher the level, the omotenashi effects increase & the stamina costs will also decrease. However, the yellow area will also shrink in size, making it harder to activate the gimmick.
✤ POINT 5: OMOTENASHI ROSTER
Different characters appear at varying atmosphere levels! Again, see the Bar Bennett Wiki page for reference. There are generally 5 slots in your omotenashi roster at any time: 3 will be taken up by the characters linked to that particular atmosphere, while the other 2 can be taken up by the characters who you set up as support party members. In the image above, my atmosphere was in the "somewhat lively" range, so White, Owen and Chloe appeared as the 'linked' characters while Shino & Mitile appeared in the 'support' slots of the roster!
A small heart icon appears to the characters who are set up as your support members. When the characters have those heart icons, the stamina cost of their omotenashi will be halved. They'll also appear outside of their designated atmosphere levels, making it easier to activate their bonus. Everyone recommends people to bring Mitile and Cain in their support party because of this.
You are not able to activate the same bonus twice. So If you've activated Figaro's bonus once, he'd leave the bar feeling
Your main wizard will be excluded from the omotenashi list. So if Mitile was set up as your main wizard, his bonus won't appear. Ever. This Bar Bennet strategy works on anyone but Mitile for this reason.
✤ POINT 6: [CHANGE]
The green [CHANGE] button allows you to refresh your omotenashi list. Refreshing will do 2 things: it'll change the position of the yellow area, and the roster of people on your omotenashi list. This is very useful to press when your yellow area is at an unfavourable position, usually being too far away. When that happens, [CHANGE] and bring the area closer to you. When your omotenashi lv is 4, you can also use this command to make Mitile appear in the roster. MAKE SURE HE APPEARS IN THE ROSTER BEFORE YOU TRY TO INJURE YOUR WIZARD LATER ! ! ! ! !
✤ POINT 7: ("SEE BUFFS")
Uh. Yeah. You can check all of your active bonuses there.
Those are a lot of points to keep in mind, but really, that's only because I can't write short!! It's actually really easy! You'll remember everything by heart eventually.
---
II. Party Formation
Anything. Anything. Really.
Here's the thing; Mitile's omotenashi bonus adds +100 to all parameters at lv 4. Combined with three large magic biscuits, The total added parameter will be +600. That leaves you to get 200 parameters to all attributes by normal means. You can get that much with any card!! I've done it with 4 SRs + 1 SSR (friend) setup many times before. All Bar Bennett regulars can do it. It's just really, bloody frustrating..............
There is an 'ideal' party setup to make your life easier, tho. It's this:
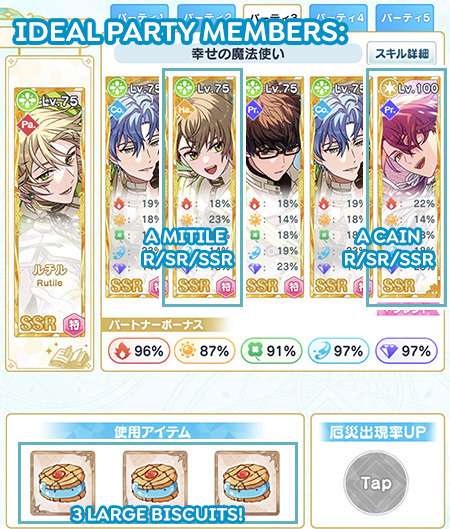
A Mitile and a Cain are all you need ☆
✤ 3 BISCUITS
Mandatory. You can bring 2 large + 1 medium and it'll still work out. I personally prefer using 3 large biscuits just to be on the safe side.
✤ MITILE
The optimal timing to gain Mitile's bonus is when your omotenashi level is at 4. It adds +100 parameter bonus at a high cost: 60 stamina. This is real hard to pull off! Fortunately for us, this cost can be decreased to 30 by bringing Mitile along. Most Mitile card works! R, SR, SSR, whatever you have, really, as long as it's not incompatible to the strategy. More explanations down below.
✤ CAIN
Cain is also a very good party member to have! His omotenashi bonus gives you a high chance (60%) to immediately increase the omotenashi lv by 1. Heck, your omotenashi lv can increase by 2 sometimes. I like to activate it at lv 2 so it can soar up to lv 4 right away. It gives me more time to activate Mitile's bonus! Good Cain! It still has a chance of failing tho, so there's no need to rely on this all the time when you feel that the RNG's being cruel to you. Cain isn't really necessary but nice to have! You'll see!!
✤ INCOMPATIBLE CARDS
The Mitile Cannon strategy relies on us injuring our wizards. You can injure your wizard by training when your stamina's really low. There are 2 type of cards which makes this strategy more difficult to pull off:
1) Cards which reduce failure rate. Those have, "ハプニング率-(xx)" written in one of their skill slots. Frog Etude Mitile is one such card.
2) Cards which recovers stamina. You'll know it when you see, "スタミナ+(xx)" in the skill slots. Just... don't bring these. Absolutely don't. Don't bring (Secret Uncovered) Mitile and other such cards unless you want to taste failure.
...Though, once you've gotten used to Bar Bennett, you can go with any card and go bonkers. I love this place...
---
III. Bar Bennett Strategy
There are three steps in the Mitile Cannon strategy:
1) Get your omotenashi lv to 4
2) Injure your wizard, land within the yellow area, eat your biscuits & activate Mitile's bonus
3) Finish off everything.
That's it. Simple, isn't it?
Awwright, let's see how it's done☆
---
IV. Execution
I'll aim to make an all-999, slv 5 event chibi in this guide: Anniversary Rutile! The setup that I've used is this:

Recipe vs party setup comparison
Here's a lesson about making an event chibi ☆
You actually only need the gold event trait to max out the skill level. Yep. Really. Feel free to take a look at your existing lv5 event chibis and see for yourself. In this case, acquiring either [守護] or [達観] will make Anniversary Rutile have a max skill level of 5!
By the way, a regular colour-coded chibi (like Red Mage Rutile) will need the gold, silver and bronze traits of the corresponding colour for it to have a lv5 max skill level. Just saying.
Getting both event traits will ensure the chibi's creation. A regular event chibi recipe has 2 event [compatible] traits. Acquire those two and the corresponding form is guaranteed. For example, I'm 100% guaranteed to get Anniversary Rutile by getting [守護] and [達観], unless there are other event-specific gold & silver traits mixed in. Acquiring the other compatible traits will further ensure the outcome.
Getting incompatible traits will decrease your max skill level. Yep, that's what incompatible traits do. Get the gold/silver one and your max skill level would decrease to 4. The effect can be negated by acquiring the other compatible gold trait, but it's easier to just remove all possibilities of acquiring an incompatible trait. Oh, did I mention that you can get traits by activating great successes (daiseikous), and that each location has its own daiseikou trait pool? Now you know. Be careful & don't include any incompatible traits!
You can get an event trait by activating the card episode. The rarity of the trait corresponds on the card's rarity. An SR event card will drop the associated bronze/silver event trait. An SSR event card will drop the gold event trait. So in my case, Anniversary Rutile will drop [守護] when its card episode is activated. That'll ensure a lv5 max skill level! Whee.
Let's move on to the actual practice!
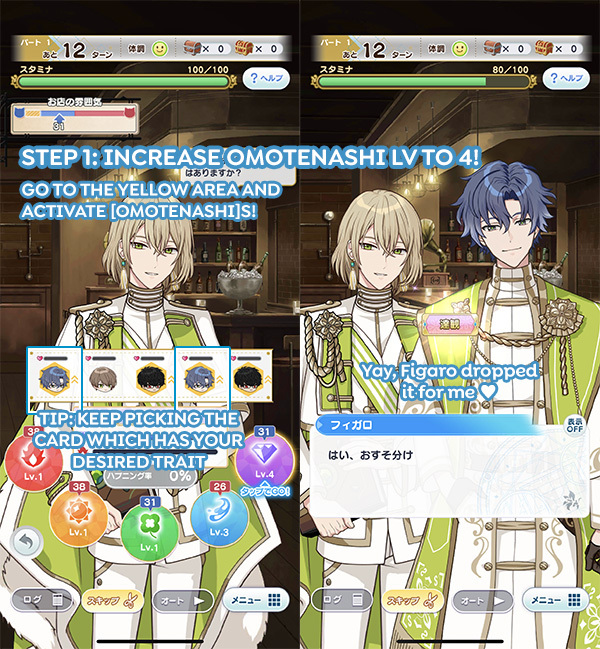
✤ STEP 1: Raise your omotenashi lv to 4
Land yourself in the yellow area and activate the gimmick! It's also a good idea to keep on picking the option/card which allows your desired trait to appear. The more [a card] participate in an interaction, the higher the chances of your desired trait to drop. In this case, I wanted Figaro's [達観] trait, so I picked an option which allowed Figaro to participate! He appeared and his trait dropped as a result. Sweet! Now my anniversary Rutile will have a max skill level of 5.

Another tip: Nero and Rutile's bonuses are actually really useful and I recommend selecting those whenever available. Their bonuses increase the partner's (your card's) favourability by 20 and 40 respectively. Basically, it fills up the heart meter of your cards. Filling it will make the card participate more often during interactions. More interactions = more chance for their traits to drop! Hence, it's a good idea to boost the favourability of the cards which has your desired trait. I would've given the boost to Figaro if he hadn't dropped his [達観] trait already. Nero and Rutile's bonus will make your life relatively easier!
Alright, let's keep going!

Lo and behold, Rutile's card episode appeared! That dropped the [守護] I was aiming for. With 2 gold event traits acquired, Anniversary Rutile chibi is guaranteed to come!
Oh yeah, immediate parameter bonuses are good to get too, like Figaro's [Cool +40] or Mithra's [Happy +40]. Alternatively, Arthur's [stamina +60] can come in handy. You can't go wrong with those.
Having Cain around makes it easier to get through this part! Try activating his bonus ☆ You may win, you may lose
Continue to activate omotenashis and increase the level! Remember: use the green [CHANGE] button whenever the yellow area is too far away from you. It helps a lot! ...Most of the time. Bad runs happen
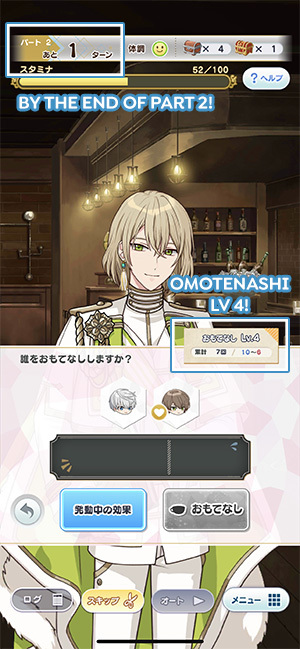
Lv 4! It can take 2 whole parts without Cain to get here..
Aaand now we are here, at omotenashi lv 4! Getting here by the end of Part 2 is pretty normal without Cain. Make sure that Mitile's in your omotenashi roster before we move on to our next agenda: injuring our wizard and activate Mitile's omotenashi bonus!
I repeat: MAKE SURE MITILE IS YOUR OMOTENASHI ROSTER!!!!!!!!
- sincerely, someone who had forgotten to double-check many times over and regretted it immensely
✤ STEP 2: Injure your wizard & activate Mitile's omotenashi bonus
THIIIIIIIIIIIIIIIIIIIIIIIIIIIIIIIIIISSSSSSSSSSSSSSSSSSSSSS is the hardest part. You have to anticipate the mood changes, land yourself at the right spots and timing. But what are the right spots? What are the right timing? How can you anticipate when your wizards would get injured? In the following paragraphs I will explain 3 prime positions where you can land your injured wizards at. Theory lesson time!

First, you've got to know when your wizard would get injured. How many turns would you have? Generally speaking (and assuming that you did not bring any stamina-recovery cards) 45 stamina would give your wizard a high chance to get injured in 2 turns. 55 stamina would provide you with 3 turns. Anticipate this first, then plan where you want to land your injured wizard at.
POSITION A
Position A is located 1 step away to the left side of the yellow area. Place your injured wizard here and train! Aim for the yellow spot! If everything goes well, (A-1) he won't budge and recover some stamina instead. Then (A-2) train and land yourself within the yellow area. (A-3) Eat your biscuits and activate Mitile's omotenashi bonus! This position works when you've got sweet Mitile in your party.
POSITION B
Position B is located anywhere inside the yellow area, preferably right smack in the middle. In the event that (A-1) fails, this is where you should land yourself at. The Position B method requires your wizard to recover stamina here, then activate Mitile's bonus. Now, before you do anything, you should check on your resting mood and anticipate the next change. For example -- in the image I've provided above -- resting on that turn will decrease the mood by 19. That means resting will decrease the mood by 22~29 in the next turn. What you want to do here then, is to (B-1) train & pick the option which adds the mood by 22~29. If everything goes well, then your wizard would rest and recover some stamina. Then (B-2) you can eat your biscuits and activate Mitile's omotenashi bonus.
POSITION C
Position C is located 1 step away to the right side of the yellow area. This is where you should land in the event that (B-1) fails. The position C method requires you to (C-1) rest and land yourself within the yellow area. If everything goes well, your wizard would stay injured. Then you can (C-2) eat your biscuits and activate Mitile's bonus. This position works even when you do not have Mitile in your party.
Now you see why sweet Mitile is very important? No? It's okay, you'll see soon enough...
Awwright, now that we're done with the theory lesson, let's take a look at how it turns out in practice!
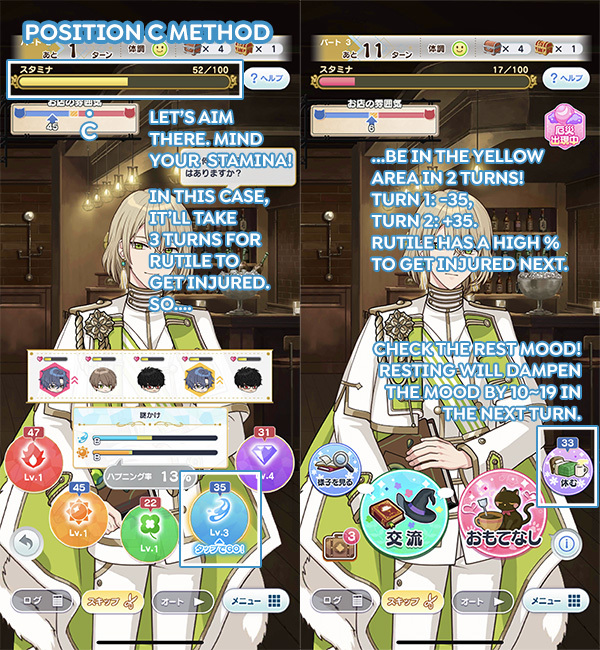
Position C method. The image says, "10~19", but that's a mistake!! It'll be "12~19" instead. I'm sorry. It's too taxing to update the image but you get the point, right?
I love this method! It's so easy! Yet so risky! And is totes suitable for Figaro & Rutile because they love their slow life & usually take a long time to recover. Oz, on the other hand, recovers lightning fast. Idk why...
Like I've said in the theory section, let's predict when your wizard would get injured! Rutile has 52 stamina, so there's a high chance for him to get injured 3 turns later. Cool beans.
Next up is finding out where position C is. It's the spot which lets you go back to the yellow area after resting. What I like to do here is (1) go to the left, (2) move to the right & land myself within the yellow area and (3) check the resting mood. My position was within the yellow area, which means that I should be back here in 2 turns. According to the mood ranges above, [-35] and [+31] options were available so that's what I picked! Now (2nd pict) I'm inside the yellow area. Check your resting mood here. It's at [-33] now, so it'll change to somewhere between [-12] and [-19] in the next turn. Let's pick an option within that range!

Again, it should be "12~19" instead of "10~19". I'm sorry, I didn't save the .psd
Now go to position C! Luckily for me, [+19] is available so that's what I picked! Rutile has a 70% rate of getting injured. That's a pretty good rate, but will he really get hurt? The answer is... no, he pulled through.
(...)
(A moment of silence, please)
As you can see, if everything had gone well and Rutile was injured, then I would be able to rest, go back to the yellow area and activate Mitile's bonus. Then this guide would end here. Alas, sweet Rutile worked hard and that didn't happen. Sighs....
It's too early to give up! There are 1 part + 10 turns to go. Let's try again! Oraaaa

BOOM
We're back at position C and Rutile is injured. Very good. Excellent. At this point, all we have to do is rest, hope for Rutile to stay injured and activate Mitile's bonus. But will he actually do that? The answer is...
No. His injuries recovered.
(x__x)
i... It happens! It happens sometimes!!!! It usually doesn't happen to me but who knows why Rutile is being extra energetic for this guide!!!!!! Maybe he's just trying his best to be a good teacher? Anyways, this method has failed me twice in a row, so I'll try a different one...
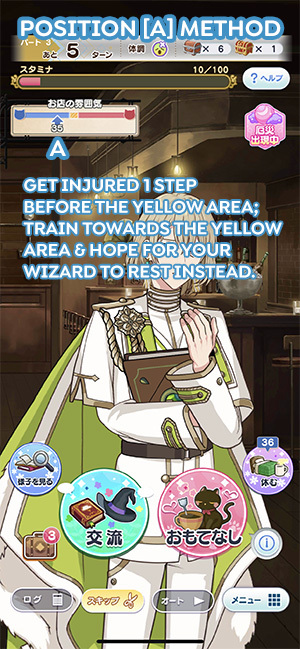
Position A method
We are here, injured, at position A: 1 step away to the left of the yellow area. Our next step is to land ourselves within the yellow area. If everything goes well, then Rutile won't actually do it and recover some stamina instead. Would he do it?

He did.
He did! He rested! Yay! Now land yourself in the yellow area like the image above.
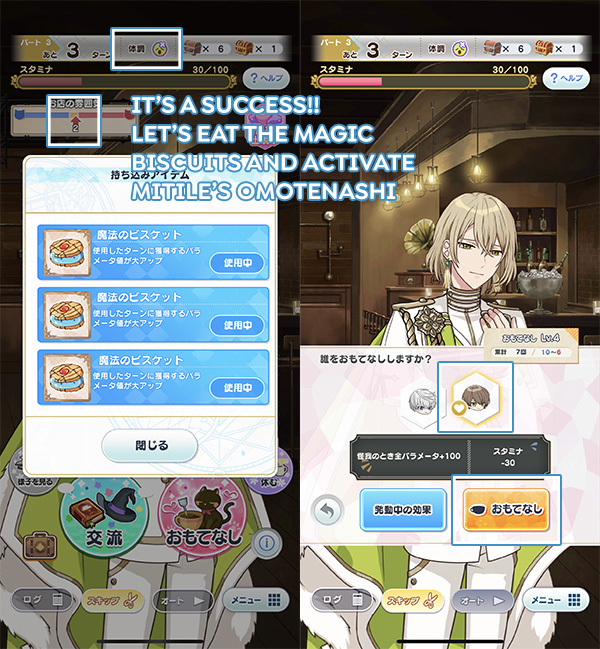
Final part!
Stamina, check. Position, check. Injury, present. Magic biscuits, eaten! We are done here, folks. That's how you can fulfil all of the conditions to activate Mitile's omotenashi bonus. Whew! Activate it and watch the numbers roll!
Everybody say, "THANK YOU, MITILE!!!!!! ♥ ♥ ♥"
Our work is done here. At the end of it, your stats should look something like this:
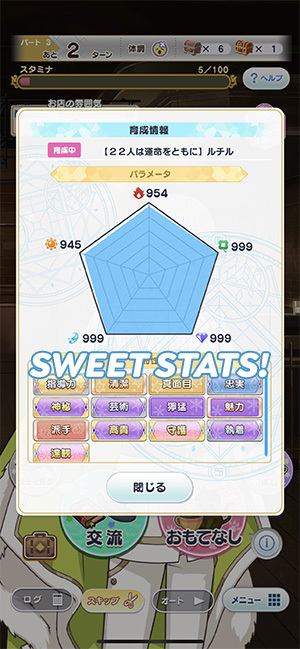
Congrats for making it this far!
✤ STEP 3: Finish off everything
Train normally! Get those 999 stats! If your desired trait(s) hasn't dropped yet, keep on making that card participate and hope for it to drop!
You should be able to get an all-999 chibi at the end of the session.

TA-DAAAAHHHH
Aaaaaand we're done! Congrats for reaching this point and I hope that was helpful for you.
---
In conclusion
1) Get your omotenashi lv to 4
2) Injure your wizard, land within the yellow area, eat your biscuits & activate Mitile's bonus
3) Finish off everything
4) Mitile is the best.
Thanks for coming to my TED talk
Tags: